As we all know,as a photograph lover who are holding an iPod touch, you must have taken a great number of photos with the small gadget. But there are some situations you may encounter that bring with the need of deleting these photos permanently. For example, you have taken lots of private pictures and not you want to delete them off because you want to give the old iPod away. Or maybe because you want to donate or resell your old iPod, but you don’t want others to see the photos you saved on it.

Delete Photos & Photos Library from iPod
With Too many photos on your iPod Photo Library, you probably can’t wait to delete all of them to free up your iPod space. But it frustrates you that you can only delete photos in your iPod Camera Roll one by one. Therefore, to delete Photo Library from iPod, I’d like to recommend you to use a third-party tool – iPod Data Manager (Windows) or iPod Data Manager (Mac). Both versions of this program empower you to delete iPod Photo Library in batch. Before deletion, you can transfer your iPod Photo Library on your computer for backup and sharing.
Free download a trial version here:


Step 1. Connect your iPod with your computer
First of all, to learn how to get photos off iPod, you ought to install and launch this useful tool on your computer. Use the USB cable which comes with your iPod to connect it with your computer. After it’s connected, the tool will automatically detect it. Then, your iPod will be shown on the main interface of iPod Data Manager.

Step 2. How to get pictures off your iPod
In the left column, click "Photos" to bring up the photo management window. Then, in the photo management window, open one album, like Photo Library. Choose your wanted photos. When you finish, you should click "Delete".

Then, this tool will start deleting photos on your iPod. Make sure your iPod is connected to your computer all the time.
Erase All Photos on Your iPhone Permanently
An easy way to solve this problem is to delete all of the photos manually. However, this method is not safe as it seems. Actually, those deleted iPod photos are still stored on the device unless new data is written to the same piece of storage. The photos can be restored with the help of certain data recovery software. To delete iPod photos permanently, you should use iPod Data Eraser instead. iPod Data Eraser is a powerful and easy-to-use data wiping program designed for the purpose of data deletion on iOS based devices. It’s the ultimate solution to erase iPod pictures permanently and the data is no longer recoverable.
Install the iPod Data Eraser or iPod Data Eraser for Mac application on your PC. Open the application. Connect your iPod touch to your computer with USB cable. The iPod Data Eraser software would detect your iPod touch (or any other iOS device).
Note: Please remember to backup data from iPod to PC or iTunes/iCloud before wiping your iPod device.


Step 1. Click "Erase All Data" in the left sidebar

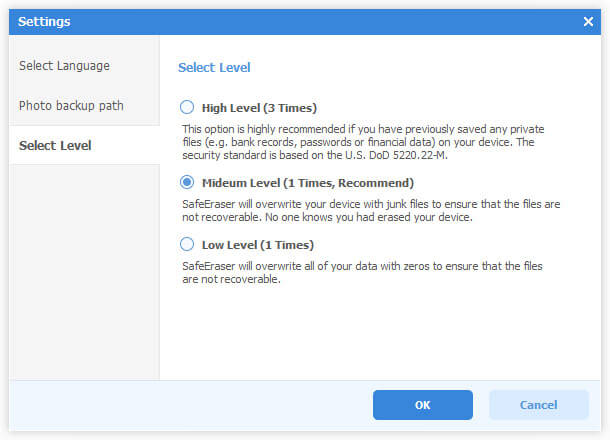
Choose the security level to erase all the data on your iPod.
Step 2. Erase all the data on your device
You will be prompted to type the word ‘delete’ to confirm the permanent deletion of the data, including photos, images, pictures, notes, videos, calendar and more.

Once deletion is complete, you will see the Completed screen, click "Done".
Compress iPod Photos to Free Up Space
With the help of this wiping tool, you can also compress your iPod device captured photos to reclaim more storage from iPod.
Step 1. Click "Photo Compressor " in the left sidebar. Click "Start Scan" to let the program scan your iPod for large photos in the Photo Compressor window. It take a few seconds to finish the scan.

Step 2. After the scan, all large photos will be displayed in the window. And from the window, you can see that how much space you’re going to save by compressing all these photos. Check photos you want to compress.

In this scan result window, you can see the "Backup path". It is the destination where all your original photos will be saved (before compressing all your large photos, iPod Data Eraser will make backup for you in case you need them in the future). You can click it to customize your down destination to save the photos on your iPod touch, as well as iPhone, iPad.

Step 3. Click "Compress now" to let iPod Data Eraser compress photos on your device for you. It only lasts a few seconds. In the result window, you’ll get how much space you’ve saved by compressing photos and how much space left for current photos.

Related Tutorials:
How to Permanent Erase Photos Videos from iPad
How to Permanent Erase Photos on iPhone
How to Complete Delete iPod Data on Mac
This is really an awesome article. Thank you for sharing this.It is worth reading for everyone.
ReplyDeleteIphone Service Center in Chennai