12/02/2015

Don't Have to Worry About Lack of Space When Upgrading to iOS 9

If you are looking forward to installing the latest iOS 9.2 Beta 4 when Apple releases it a little over two weeks' from now but are worried that your iPhone, iPad or iPod touch won't have enough storage space for the iOS update. Please read this article carefully, you will have a pleasant surprise.

In tha past, when you are using the Software Update to download and install iOS 8, not only do you need the space to store tons of your contents like contacts, photos, videos, text messages, apps, documents and more, you also need to free up more storage space for the new operating system. That might not be a problem on a 64GB or 128GB device, such as iPhone 6 Plus, iPad Pro, ect. While for the iOS device which memory is 8GB or less than 8GB, it seem out at the elbows. So, many of time, we can heard that so many iOS device's user asking for help to free up space on iPhone iPad for iOS update.


However, with iOS 9, Apple has reduced the size of the update to 1.3GB, down from the 4.58GB of free space iOS 8 needed to install. In addition, the iOS 9 update will also uninstall certain apps and reinstall them once the update is complete in order to free up space. In another words, handy inbuilt feature on Apple's new iPhone software will automatically delete and reinstall apps to free up space for large system updates.

Apple's new operating system, iOS 9 to iOS 9.2, has several new features including better battery life and updated apps, but one of the most attractive new feature stands out. Finally, the days of deleting hundreds of photos and videos, ect. from your iPhone or iPad to free up space for large software updates are over.

Whereas in the past users were left frantically deleting the applications and elements so as to release more storage space, if you try to download iOS 9 on an iPhone or iPad with insufficient storage you are presented with a message offering to temporarily remove some applications so the program can be upgraded. The applications are then reinstalled following the download completion.

This feature will be especially handy after it emerged that Apple's new iPhones, the iPhone 6S and iPhone 6S Plus, will still contain 16GB of memory for the entry level model. The upgraded cameras on the iOS devices mean videos, pictures and other media files have the potential to take up more space, leaving less room for everything else.

Is this a good new to you, in a word, that sounds feel great, isn't it?

Related Hot Article: How to Release Space on iPhone iPad

How to Release iPhone iPad Space to Install iOS 9.2 or Later

Updating your iOS device to a new version of iOS isn't an easy task if you've got an iOS device with 16GB storage or less, such a 8GB of iPhone 5. Last year, many Apple users were caught off guard by the more than 4GB free space for iOS 8 upgrade. Even if the latest iOS 9 which is only be about 1.3GB in size, but there are still so many users complain that their device is running out of memory.

During a wireless upgrade when you're wanting to update your iPhone iPad or iPod touch to the latest iOS, such as iOS 9.2, you might see a message that says the update can't be installed because it needs more storage space than you have on your device. If you see this message, This suggests that your iOS device has not enough memory to install the new iOS, you have to free up  space on iPhone iPad iPod before iOS upgrade.
To release a vast of storage space from your iPhone iPad or iPod touch as soon as possible, so as to install the latest iOS 9.2 or later, you need a secure and reliable data clear tool. To save your time and energy, and considering the low risk factors, we strongly recommend you to use the iOS Data Wipe.


iOS Data Wipe, which has two different versions, providing the most safe and effective solution for iPhone iPad and iPod touch users to freeing up storage space and wiping personal contents without data lossing, favourite data deleting, jailbreaking and restore the device to factory setting.

Download iOS Data Wipe or iOS Data Wipe for Mac below to get a clearer picture of how it works:


1. First of all, after installing the program, run it on your computer. 
2. Connect your iOS device via USB data line to your computer. 
3. Once your device is recognized, the homepage of iOS Data Wipe will pop up as below.


How to Release Massive Storage Space on iPhone iPad & iPod touch

Step 1. Click "iOS Optimizer" in the main window, then the program will privides you 6 categories of system data to select, you need to select the categories you want and click on "Start Scan".


After that, the program will begin scanning your iOS device automatically.

Step 2. Once the scanning finish, the total amount of scanning result will be displayed on the window. Now you are allowed to click on "CleanUp" to clean up your iOS device's memory.


Note: Please remember to keep your device connected during the whole process, so as to totally clear all the selected junk files on your iPhone iPad or iPod touch. You can stay the proceedings by clicking the "Stop" button during any period of time of the wiping process.


Step 3. When the clean completed, you can preview the clean up result, accourding to your need, you can click on "Rescan" to To examine the effects of cleaning.


Related Hot Articles:

How to Restore iPhone iPad Lost Data after iOS 9.2 Update


How to Erase All Data from iPhone Permanently

How to Wipe All Data on iPad Permanently

How to Delete All iPhone Content on Mac

11/02/2015

How to Release Massive Space on iPhone iPad iPod Touch

"Help! My iPhone 5S is running very slow since upgraded to iOS 8.4, I notice that there are much useless files, junk files, browse cookies/bookmarks or app caches stored on my iPhone 5S, and it makes my device crashes more frequently than before. I have already deleted unwanted apps, photos and videos to free up some storage space but still the same problem exists. I want to speed up my iPhone by removing those useless files and app caches in order to upgrade my iPhone to the latest iOS 9.1, is there any way to Release Massive Space on my iPhone?” – Ask by Viognier.

"I'm ready to go to Hawaii on vacation with my family, and I want to take my iPad Air with me so that I can use it to watch video/TV shows, what is more, I need my iPad to take photos videos, and searching the internet to read the the travel guides. However, I found that my iPad run out of memory, but I have not installed too many applications inside my iPad, I really don't know where are my storage space gone, how can I recover Massive Space on iPad?" – Ask by Tennyone.


If you iPhone iPad or iPod touch becoming more and more slow, you may want to find a way to clean up those unwanted data, this tutorial mainly teach you how to free up space on iPhone iPad iPod permanently, and speed up your iDevices.

Cleaning up data from your iDevices will be the daily task for all iOS users if there are too many junk files on your iOS device. Why? That is because it will affect the running speed of your device. Right? Once this situation happened, iDevices users will go to search for solution, and most users prefer free iPhone iPad or iPod app. iOS Data Cleaner, the free iPhone memory cleaner, can quickly scan iOS device trashes and handle them completely. With the help of this erased tool, delete cache, cookies, error logs, game files, temp files and other junk files permanently. What’s more, this iOS data erased software not only can help you free up a lot of storage space for iPhone iPad iPod touch with one tap only, and erase all types of junk files, but also alows you erase all data from iPhone permanently without restore before selling it.

Tutorial: Release Storage Space on iPhone/iPad/iPod Touch

Step 1. Download, install and launch the iOS Data Cleaner on your computer.


After that, take out your USB cable to connect your iPhone, iPad or iPod touch to the computer. Then you can see the main interface as below:


Step 2. Choose a erased mode to let the program scan and analyze your device.

In this screen, the program provides five ways to clean up your device's storage memory, to quickly release a lot of space from your iDevice, you can choose "iOS Optimizer" here.

Press "iOS Optimzer" in the main window. The programm will show you that you can optimize the iOS device from system data and user data two parts with 6 categories: iOS System Tune-up, Download Temp Files, App Generated Files, Log Files, Cached files and Unused App Elimination. Choose some of them or all is up to your need. Press the Start Scan button, then the program will begin scanning your device automatically.


Step 3. When the scan is finish, the total amount of junk files will be displayed. Click on "CleanUp" to free up space on your iDevice.


Note: In order to totally clean up the junk files on your device, keep your iPhone, iPad or iPod Touch connected during the whole wiping process.

Related Tutorials:
How to Permanent Erase iPhone on Mac
How to Free up Space on iPhone
4 Simple Ways to Clean Up iPhone Space
How to Delete Selected Content from iPhone

10/29/2015

How to Erase iPhone 4/4S/5 Permanently?

Part 1: iPhone News - The new iPhone upgrade program will no longer be limited to the Apple Store

According to foreign media reports AppleInsider, Apple CEO Tim Cook revealed, iPhone upgrade program scope will be expanded in the future it will not be limited only to the Apple Store.


"By working with our partners, ISP cooperation that Apple eventually will be automated iPhone upgrade program." Cook said. Apple's upgrade plans include no lock, bare-metal version of the iPhone, and with AppleCare + service. After a 12-month interest-free installments, the user can choose to upgrade to a new phone.
(How to Clear WhatsApp Chat History on iPhone iPad)

Cook said: "In fact, early in 2007 we will solve this problem, but in a mainstream way to expand sales, we quickly changed this pattern." Cook refers to the first generation iPhone, when Apple sales of bare metal version of iPhone, does not bind the operator contract.

2007, through the sale of bare-metal version of the Apple iPhone mobile phone market leader. At that time, users will be able to purchase iPhone at home own set. But with the release of iPhone 3G, Apple's cell phone sales in the US will be most heavily subsidized carriers AT & T and the binding contract, which makes the new phone's settings become complicated. In fact, a few months, users must activate their new iPhone 3G in the shop, even if they are purchased online phone.

Today, operators are moving away from subsidy model contract, offer lower monthly tariff plans. Operators are more willing to let the user full purchase iPhone. In order to reduce the burden on the user full purchase mobile phones, carriers launched interest-free installments. Bare-metal version of iPhone 6s starting price of $ 649.

Part 2: Tutorial - Permanently Safe Erase iPhone 4/4S

Are you want to delete all data from your iPhone 4 or iPhone 4S permanently before selling or give it away? After the new iPhone 6S on selling, you will consider to exchange a lower price iPhone 5S, iPhone 6, iPhone 6 plus, iPhone 5, of course, you also can buy the new iPhone 6S, iPhone 6S plus or the future iPhone 7S. If this is the case, more old iPhone 4S/4 users must solve the problem that erase their old iPhone 4/4S contacts, photos, text messages, notes, videos, whatsapp data or more other data permanently before selling or give it to others. Just clear all the files on your old iPhone, how can we do it?

Problems: How to wipe or delete anything on iPhone 4/4S/5?

Here, our professional team can recommend you the useful iPhone Data Eraser tool to you, with the iPhone Data Erase you can easily delete all data including contacts, account info, apps, pictures, text sms messages, whatsapp chat history, notes, bookmarks and more files from your iPhone 4/4s/5/5s easily just one click.

Tips: First of all, you need to backup all the important data on your computer or transfer all data from old iPhone to new iPhone with Mobile Phone Transfer, click this link to transfer data from old iPhone to new iPhone follow the steps details.

So, get ready to delete all data from your old iPhone? Please download the free trail version and have a try follow the next easy steps:


 Method to Erase All Data from iPhone 4/4S/5 Permanently:

Step 1: Download and Install iPhone Data Eraser on your computer

Please download and install the iPhone Data Eraser on the computer above the download button, then connect your iPhone to the computer via USB, the main window will pop up as below: 


Step 2: Connect your iPhone to the computer and Select Right Earsing Option

Note: The program offers 4 erasing option for your different demands: "EXPRESS CLEANUP", "ERASE PRIVATE Data", "ERASE DELETED FILES" and "ERASE ALL DATA". You can select the appropriate option and give it a try. As we want to erase everything stored on the iPhone, so the first method is preferred in this case. Select Erase All Data from the sidebar, which leads to the next step.


Step3: Start to analyze and scan the data on iPhone

Click “Start Scan” button and the program will start analyzing and scanning the deleted data on your iPhone. It will take a few minutes for scanning.


Step 4: Preview and Select the Data You Want to Erase without restore

When scan is completed, it will remove all data and settings on your device. Select the data you want to delete and click “Erase Now” to begin permanently erasing the deleted files.


Step 5: Start Erasing all data on iPhone

Input 'delete ' and click Start Button to confirm that you are going to erase all the data on the iPhone. Then the program starts erasing apps, music, videos, photo, contacts, SMS and other files stored on the device. It only takes a few minutes to complete the task.


The iPhone Data Eraser is such easy and convenient to operate.Now you can freely trade the iPhone after finishing these easy steps. Don’t worry about losing any personal information. iPhone Data Eraser permanently wipes all personal data from the device and resetting system setting with just one click, which offers the most effective and safest data protection solution.


You may like:

How to Delete iMessage Messages and Attachments on iPhone

How to Clear Junk Files from Your iPhone iPad iPod

How to Erase Deleted Data from iPhone

How to Clear/Delete Pics/Photos from iPad/iPad Mini/iPad Pro/iPad Air?

How to Delete Safari Bookmarks History Cookies On iPhone

How to Clear WhatsApp Chat History on iPhone

How to Delete Apps On iPhone 6/6 Plus/5S/5/4S

How to Delete iMessage Messages and Attachments on iPhone


10/18/2015

How to Clear/Delete Pics/Photos from iPad/iPad Mini/iPad Pro/iPad Air?

Part 1: iPad News - Low-key upgrade Apple iPad mini 4 Reviews

This generation of mini 4 with a similar iPad Air 2-generation thin body, used for many years before the appearance of the last three generations have changed, the body is reduced from 7.5 mm to 6.1 mm, 1.4 mm is the difference between the carrying figure, the figure at the same time reflects visual and touch, but the latter is more obvious. Both will take in his hand, the metal texture will bring exquisite feeling passed more obvious.


Screen: clearer

iPad mini 4 screen remains at 7.9 inches, the resolution is still with the three generations of the same is 2048x1536, pixel density of 326ppi.

Sensory experience of this screen is absolutely not parameters can be described, even if they completely consistent parameters.

mini 4 uses the same with the iPad Air 2 on behalf of the whole fit screen: special glue to the panel with the touch screen seamless paste together, due to the cancellation of the air layer, so that it becomes more light, the better display and uses the mobile phone technology in the state almost entirely off-screen can not see the screen, making the phone feel more strengthened integration.

Part 2: Tutorial - How to Clear/Delete Pics/Photos from iPad/iPad Mini/iPad Pro/iPad Air?

Taking photos/pics is one of the most used functions for almost every iPad owner. With its 8 megapixels camera, there is no need to buy an extra digital camera for photography any more as iPad already have done a great at this. I am dare to day that most of the storage space is eaten by your photos, which is one of the most precious asset for us. And sometimes, it’s in such a high privacy that we don’t want to share them to others. This comes to the problem when you think about selling your old iPad to another person and you’re definitely not willing to see your private photos leaked online by someone else.

Whether you want to re-install your iPad as new or you want to sell or give it away to someone else entirely, you first need to make sure you've wiped it clean and erased all of your personal data, including your photos, messages, and files. It only takes a few steps, and few minutes, and it makes sure you're data is protected.Fortunately, there is an app called iPad Data Eraser which is developed with the aim to clear all Pics on iPad/iPad Mini/iPad Pro/iPad Air in a simple way.

Drive away all fears of having your photos exposed or used as threat. Install iPad Photos Eraser to your computer and destroy all photos before you give your gadget to a buyer or to someone you want to have it. This iPad photo eraser program uses technology of destroying data and it can completely obliterates all data and no matter how knowledgeable or how to delete iPad photos permanently, he would never be able to get any photos from your iPad.

Please download the free trail version below and have a try:


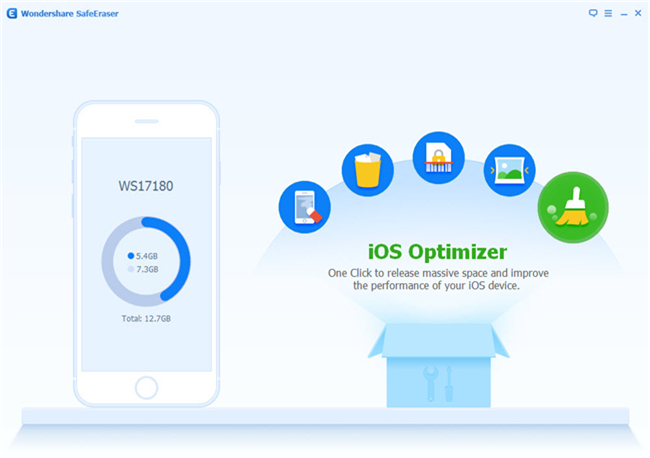
Step 1 Download and Install iPad Photos Eraser
 
Download the installation file via the Download button, and then install the software on your computer. The software will be launched automatically at the end of installation. After that, connect your iPad to PC via Apple USB cable, and waiting for the device being recognized by the software.
 
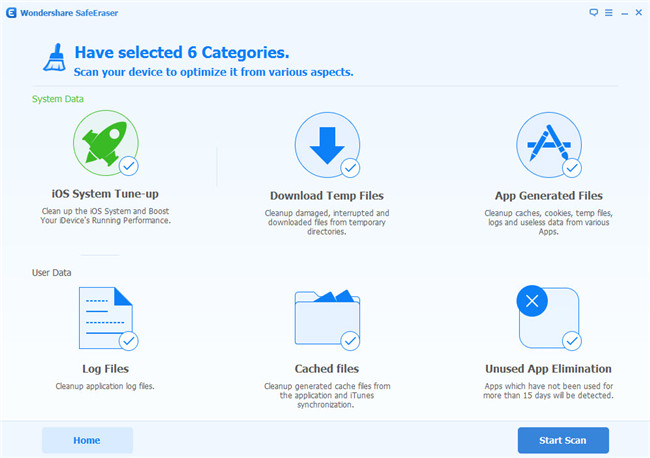
In the lasted update, there are four earsing options available: "Express Cleanup" "Erase Private Data" "Erase Deleted Files" and "Erase All Data".. Each reasing option has different erasing purpose.


Step 2 Select Erasing Option and Start to Analyze Your iPad


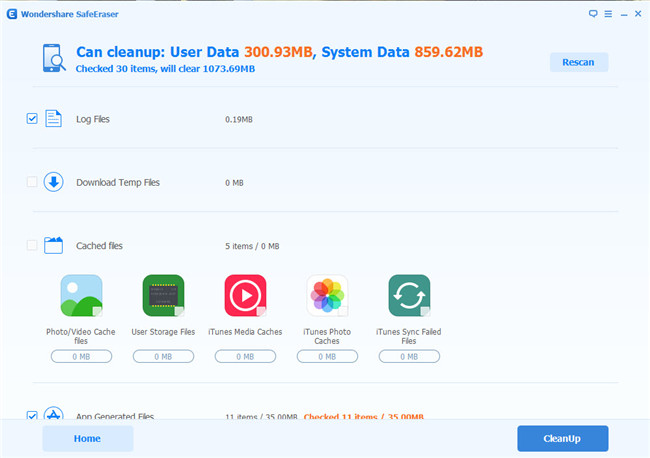
Step 3 Preview the Scaned Result and Erase Private Photos Selectively

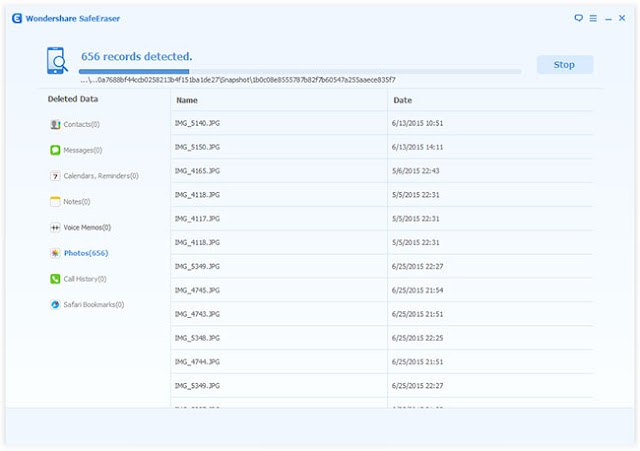
This step will deep scan your device, with this option you can see what data still remains on the device and be sure that the files you previously deleted are no longer accessible or recoverable. It may take 5 or 10 minutes finish the task based on the size of data. After scaned, you can preview all scanned data.


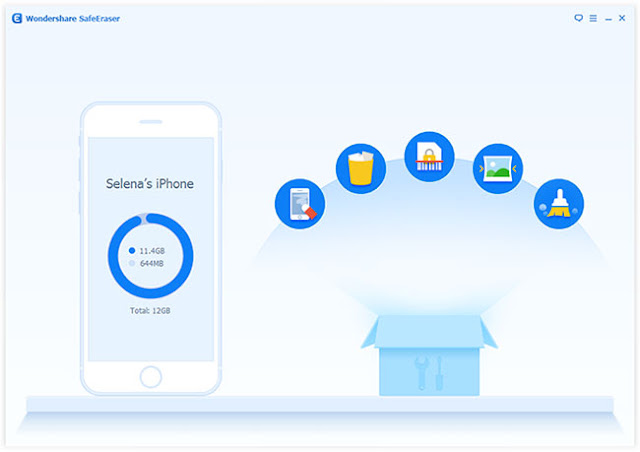
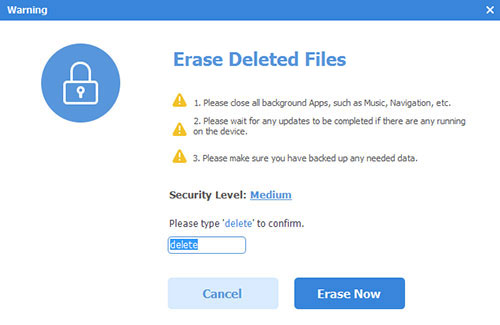
Step 4 Erasing Your Photos or Other Data without Restore


iPad Data Eraser supports up to 28 types of file, such as Safari Bookmarks, photos and so forth. Sincerely hope that it can help you with this kind of difficulty. And if you want to share this article with your friends, please make use of the social platform by clicking the icons.

Tips: Before you use this iPad Data Eraser to wipe everything on your iPad,you must to backup those important data to computer at first with this Mobile Transfer,because once wipe your iPad data with this data cleaner tool,you can’t get them back forever.


More related articles:

How to Delete iMessage Messages and Attachments on iPhone 

10/07/2015

iPhone iPad Notes Eraser - How to Permanent Delete A Note from iPhone iPad

The Notes app of iPhone iPad is very easy to use, simple to edit and convenient to delete, if you only have a few apps on your iPhone or iPad, Notes should take a place there. The Notes application of Apple is truly indispensable. It allows you to easily and quickly record notes from your to-do things, grocery lists, telephone numbers, important meetings, birthdays, memos, addresses, date time, annotations, web links, site, and many more. So, there will creat lots of notes on your iPhone or iPad.

Generally, Notes app is used to write down something important, many of them are private so that you don't want them to see by others. However, there comes to a problem when you are preparing to resell or give away your old iPhone after buying a new one, you certainly don't want these important notes leaked without your permission, so permanent erase those notes from iPhone iPad absolute is your best right choice. But, as we all know, simple deletion may let your notes being restored by someone via a professional data recovery tool like iPhone iPad Data Recovery program.


To permanent delete a note and all notes from your iPhone iPad, you need a reliable data erasing software. iPhone iPad Data Eraser is a powerful and customized data wiping app that helps you delete private data in seconds. What more important is that the data deleted by program won’t be restored by any data recovery software , which means your private data is under security at any means. You have the options to erase all of the data stored on your iPhone or just wanted types, such as notes, photos, messages, or histories.

iPhone iPad iPod Data Eraser       iPhone iPad iPod Eraser Mac

Part 1: How to delete a Note on iPhone or iPad (Conventional Ways)

1. Launch the Notes app from the Home Screen of your iPhone or iPad.
2. Open the note you want to delete.
3. Tap on the Trash can button.

There's also a gesture shortcut to delete notes faster, right from the list.


1. Touch the note title at the far right and swipe to the left to reveal the Delete button.
2. Tap the Delete button.


Part 2: Permanent delete a Note from iPhone iPad

What You Need:

1. Your iPhone and its USB cable;
2. iPhone iPad Data Eraser;
3. A Windows PC or Mac;

Tutorial Steps:

Step 1. Delete the note(s) unwanted on your iPhone or iPad manually using the way like Part 1.

Step 2. Install and launch the iPhone iPad Data Eraser tool on your PC or Mac, and connect it with your computer by using USB cable. After that, you will see the pop-up interface as below picture.


Step 3. Choose the erasing mode according to your specific needs

Since the notes have been deleted on your iPhone or iPad, so here you're suggested to choose "Erase Private Data", "Erase Deleted Files" or "Erase All Data" in the left panel. Then you can click "Start Scan" button to conduct the scanning on your device. Wait for a little while, you can see the scanning results in the program in the form of folder.

· Erase Private Data: Safari cache, safari history, safari cookies, keyboard cache, message, message attachments, call history, notes, photos, etc.


· Erase Deleted Files: Messages, iMessage, contacts, call history, facetime, calendar, reminders, notes, safari bookmarks, photos, videos and so on.


· Erase All Data: Erase all data on your iPhone iPad iPod, setting it as a new device.


Step 4. Permanently delete note(s) on iPhone

When the scan is finished, you're able to check "Notes" to preview all the notes you're going to delete permanently. Click 'Erase Now' to delete a note, some notes, all notes or all data from your iPhone iPad completely.


You will be prompted to type the word 'delete' to confirm the permanent deletion of the data. Enter 'delete' and move forward.


Note: Please remember to backup data from iPhone iPad to your PC before wiping your data, once the erased process finished, nothing is recoverable.

Relevant Hot Articles:
How to Erase iPhone Data on Mac
How to Recover Deleted iPhone Notes (Which not deleted by 
iPhone iPad Data Eraser)

10/05/2015

How to Delete/Merge Duplicate Contacts from iPhone iPad

Case 1 from Dennis: Because 3 or 4 contacts somehow had duplicates that filled screen after screen on my iPhone 6, I had over 5 more thousand contacts. I used Google to find many ways to eliminate the dupes and found no any useful methods to help, what can I do for the duplicate contacts from my iPhone?

Case 2 from Phelps: I bought a new iPhone 6s to replace my old iPhone 5 last week, I synced all contacts from iPhone 5 to iPhone 6s once I got it. After that, I restored data from iCloud backup, too. However, I found duplicate contacts after setting up iCloud backup files, There are over 3000 phone numbers on my iPhone now, I don't want to delete the duplicate contacts one by one, how can I merge them at one time?


Contact duplication is a phenomenon which makes hell out of the iPhone iPad users, and for the same reason the duplicated contacts are to be deleted to make sure that the user gets the best out of the phone and the contacts are also kept in order. It is also to be noted that the iOS user should make sure that the tutorial in this regard is read and understood in full so that the best and the state of the art process that would be explained are not only followed but also applied if there is a next time to avoid any inconvenience.

If the contacts are not many, you can delete the duplicate contacts by yourself on your iPhone with the traditional practices. Tap "Contacts" on iPhone. Scroll down the contact list to find the duplicate contacts that you want to delete. Click "Edit" at the upper-right corner. Scroll down to the end of the screen. Click "Delete Contacts".


However, for tons of contacts, a better approach is better than everlasting patience. iPhone Data Manager is the best choice and the state of the art tool to make sure that the users to easily manage data on iPhone iPad and iPod. With the help of this management software, not only you can merge duplicate contacts with ease, but also makes sure that he user gets the best experience in relation to the iTunes, videos and photos management.

iPhone iPad iPod Data Eraser       iPhone iPad iPod Eraser Mac

Supported Apple Devices

 iPhone iPhone 6, iPhone 6 Plus, iPhone 5s, iPhone 5c, iPhone 5, iPhone 4S,          iPhone 4, iPhone 3GS

 iPad iPad air, iPad mini with Retina display, iPad mini, iPad with Retina        display, The New iPad, iPad 2, iPad

 iPod iPod touch 5, iPod touch 4, iPod touch 3, iPod classic 3, iPod classic 2,      iPod classic, iPod shuffle 4, iPod shuffle 3, iPod shuffle 2, iPod          shuffle 1, iPod nano 7, iPod nano 6, iPod nano 5, iPod nano 4, iPod nano      3, iPod nano 2, iPod nano
iOS iOS 5, iOS 6, iOS 7, iOS 8 & iOS 9

Steps to Delete/Merge Duplicate Contacts from Your iPhone iPad

Step 1. Launch the Program and Connect iPhone iPad with PC

Note: Before using iPhone Data Manager, please make sure that you have installed iTunes on your computer. Only with iTunes installed on your PC, it will work properly.


Step 2. Merge duplicate contacts from your iPhone iPad

Once your device detect by the program, you can see your device show on the primary window. Now click on "Contacts" on the left sidebar, then in the contacts window, click on the button "De-duplicate" on the top, the program will scan and show you the duplicate contacts after scanning. After that, click "Merge Selected" to merge all duplicate contacts or select the duplicate contacts to delete from your device.


Note: The process will not speed too much of your time, please wait patiently, and please remember keep your device connected during this process.

Relevant Hot Articles:
How to Permanent Delete Contacts on iPhone iPad

How to Erase Deleted Contacts from iPhone iPad